Your Drywall Repair Cheat Sheet for 2023

Everything You Need to Know About Drywall Repair, Removal and Installation in 2023

Drywall installation, removal, and repair are common services that many homeowners require at some point. Whether you’re renovating your home or fixing a damaged wall, it’s important to know you options when it comes to how to properly install, remove, or repair drywall. In this blog post, we’ll discuss the benefits of hiring a professional drywall contractor, how to remove and install new drywall, common drywall problems and how to fix them, the cost of drywall services, and more.

Benefits of Hiring a Professional Drywall Contractor

Hiring a professional drywall contractor has many benefits. One of the main advantages is their expertise and experience in the field. A professional contractor has the knowledge and skills to properly install, remove, or repair drywall, which ensures a high-quality finished product. 
 
In addition, hiring a professional contractor can save you time and money in the long run. They have access to the proper tools and materials needed for the job, which means you won’t have to purchase them yourself. They also work efficiently, which means the project will be completed in a timely manner. An experienced drywall contractor can also help you avoid making the mistakes a novice might make when installing drywall, most commonly is knowing the proper spacing to put between sheets of drywall which varies from climate to climate. Drywall expands in the Summer and contracts in the winter and can also move with shifts in your foundation, so it’s important that it is installed with extra care to prevent cracking in the future.

How to Remove Old Drywall

Removing old drywall can be a messy and time-consuming process, but with the right tools and techniques, it can be done quickly and safely. Before you begin, it’s important to prepare the workspace by removing any furniture or fixtures from the area. You’ll also need to wear safety gear, such as gloves and goggles, to protect yourself from dust and debris.
Removing old asbestos containing drywall with a pry bar and utility knife
The next step is to score the drywall using a utility knife, creating a grid pattern. Then, use a pry bar or hammer to gently remove the drywall from the wall or ceiling. Once you’ve removed all the drywall, you’ll need to dispose of it properly.

How to Install New Drywall

Installing new drywall requires some preparation and planning. First, measure the area where you’ll be installing the drywall and cut the sheets accordingly. It’s important to use the proper tools, such as a drywall saw or rotary cutter, to ensure a smooth and precise cut.
Once you’ve cut the sheets, attach them to the wall or ceiling using screws or nails. Be sure to leave a small gap between each sheet to allow for expansion and contraction during summer and winter months. After the sheets are attached, use joint tape and joint compound to cover the seams and create a smooth finish. Sand the joints lightly and apply a second coat of joint compound if necessary.
Drywall repair Fixing water-damaged drywall by removing the damaged area and patching with joint compound

Common Drywall Problems and How to Fix Them

Drywall can be susceptible to a variety of problems, such as cracks, holes, and water damage. These issues can be unsightly and can compromise the structural integrity of your walls or ceilings. Here are some common drywall problems and how to fix them:

Cracks in Drywall

When repairing drywall, it’s important to assess the severity of the damage and determine the appropriate repair method. For small cracks, such as those caused by settling or minor impacts, joint compound and joint tape can be used to patch the area. 
 

Here are the steps to fix small drywall cracks:

1. Clean the area: Before starting the repair, use a clean cloth or sponge to remove any dirt or debris from the damaged area.
2. Apply joint compound: Using a putty knife or drywall trowel, apply joint compound over the crack. Be sure to spread the compound evenly and smoothly.
3. Apply joint tape: While the joint compound is still wet, apply joint tape over the crack. Use the putty knife or trowel to smooth out any air bubbles or wrinkles in the tape.
4. Apply a second coat of joint compound: Once the joint tape is in place, apply a second coat of joint compound over the tape. Be sure to feather the edges of the compound to blend it in with the surrounding area.
5. Sand and finish: Once the joint compound has dried, sand the area lightly with a fine-grit sandpaper to create a smooth surface. You can then apply paint or texture to match the surrounding area.

Here are the steps to fix larger drywall cracks

For larger cracks, such as those caused by water damage or structural issues, you may need to remove the damaged drywall and replace it with new drywall. Here are the steps to replace damaged drywall:

1. Cut out the damaged section: Use a drywall saw or utility knife to cut out the damaged section of drywall. Be sure to cut along the edges of the studs to create a clean, straight line.
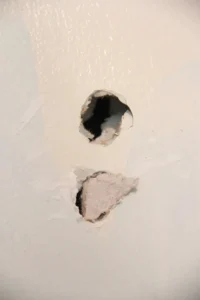
2. Secure the replacement piece: Screw the replacement piece of drywall to the studs using drywall screws.
3. Apply joint tape and compound: Apply joint tape and joint compound over the seams between the new drywall and the existing drywall. Be sure to feather the edges of the compound to blend it in with the surrounding area.
4. Sand and finish: Once the joint compound has dried, sand the area lightly with a fine-grit sandpaper to create a smooth surface. You can then apply paint or texture to match the surrounding area.
By following these steps, you can repair small and large cracks in your drywall and restore your walls to their original condition. If you’re not confident in your repair skills, consider hiring a professional drywall contractor to do the job for you.

Holes in Drywall

Fixing holes in drywall with spackle
To fix small holes, use spackle or joint compound to fill the hole and create a smooth finish. For larger holes, you may need to cut a patch from a new piece of drywall and attach it to the wall using screws or nails.

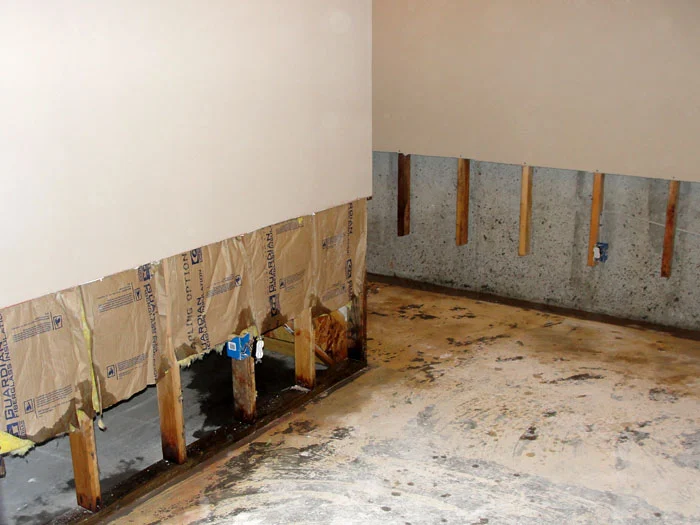
Water Damaged Drywall

First things first, water damage is not to be taken lightly. We highly recommend getting professional help when water damage has occurred. The likelihood that mold, mildew, or further unexpected structural damage could occur is very high. If you do decide to attempt it yourself or if you just want to make sure the professional you hired is taking all the proper steps to remediate your water damage, then here’s how to fix water-damaged drywall.

Fixing water-damaged drywall by removing the damaged area and patching with joint compound

Here are the steps to fix water-damaged drywall

1. Have a professional moisture test done and asbestos checkHire a professional to take moisture reading of the drywall and other potentially effected areas. This will let you know the extent of the damage as water can travel much further up drywall than you may expect. If your home was built before the 2000’s have an asbestos test done to make sure your drywall doesn’t contain cancer-causing asbestos fibers.

2. Set up HEPA filter fansWater damage can quickly lead to mold and mildew growth. So it’s important to filter the air to prevent mold spores from spreading throughout your building.
3. Do a flood cut: You’ll need to remove the damaged area and allow it to dry completely. This is called a flood cut. If there is any other wetted material, such as insulation, you will need to remove and replace that as well.
4. Dry the area: Have professional-grade fans blown on the dampened area for 2 to 5 days depending on the quantity of moisture the area absorbed. Then have another professional moisture test done to make sure all the moisture is removed. Drywall and insulation both have a tendency to wick water and draw them up like a sponge. The moisture readings will help you know the extent of what area should be removed.
5. Dry the areaHave a specialist come up out to check for budding mold spores, and to spray a protective coating, that kills mold and mildew, called Kilz on the inside of the wall. Once it’s dry and mold mitigation steps are taken, you can cut a new piece of drywall to size and patch the area with joint compound and joint tape.
Water damage to drywall should be taken very seriously because of the potential for mold growth. If mold, mildew, or asbestos is found you should strongly consider hiring a professional asbestos removal crew

Cost of Drywall Services

The cost of drywall services can vary depending on the size and scope of the project. For example, the cost of installing new drywall can range from $1 to $3 per square foot, while the cost of repairing drywall can range from $150 to $1,000 or more, depending on the extent of the damage, and whether or not texturing and paint will need to be matched to the existing drywall surrounding the damaged area.
It’s important to get a quote from a professional drywall contractor before beginning any project. They can provide an accurate estimate based on the size of the project, the materials needed, and the amount of labor required.

Painting the New Drywall

After the new drywall has been installed and finished, it’s time to paint it to give it a finished look. Here are the steps involved in painting new drywall:
1. Prepare the space: Before starting to paint, it’s important to prepare the space to avoid getting paint on places you don’t want it. Cover the floors with drop cloths or old sheets to protect them from drips or spills. Remove any furniture from the room or cover it with plastic sheeting. Use painter’s tape to mask off any areas you don’t want to get paint on, such as baseboards, molding, or electrical outlets. If you’re painting the ceiling, consider using a roller with an extension pole to avoid getting paint on yourself or your surroundings. Taking these precautions will help make your painting project go smoothly and prevent any unnecessary messes or damage.
2. Prime the walls: Before painting, it’s important to prime the walls to ensure the paint adheres properly and provides a smooth finish. Use a drywall primer and apply it evenly with a paint roller.
3. Sand the walls: Once the primer has dried, sand the walls lightly with a fine-grit sandpaper to remove any imperfections and create a smooth surface.
4. Apply the paint: Choose a paint color and apply it to the walls with a paint roller or brush. Apply one coat, let it dry, and then apply a second coat for best results.
5. Finish the edges: Use a paintbrush to carefully touch up any missed spots, and paint the edges of the walls and around any trim or molding for a clean, finished look.
6. Clean up: Once the paint has dried, remove any painter’s tape and clean up any spills or drips.
By following these steps, you can ensure a professional-looking paint job on your new drywall. If you’re not confident in your painting skills, consider hiring a professional painter to do the job for you.

Conclusion

In conclusion, drywall installation, removal, and repair are important services that many homeowners require at some point. Hiring a professional drywall contractor can ensure a high-quality finished product, save time and money, and provide peace of mind knowing the job was done right.
If you’re in Tarrant or Dallas County and need drywall services, contact us we at Texas Asbestos Removal would love to hear from you. Our team of experienced professionals can provide a free estimate and ensure a job well done. Thank you for reading and we look forward to hearing from you.